Cribbs Style

  • About
  • Blog
  • Let’s Connect!
  • Privacy Policy and Disclosure

One Room Challenge- Master Bathroom {Laying Tile}

DIY· Family· HD Jeffrey Court· Master Bathroom· One Room Challenge· Paint· TIle· Vintage Bathroom

2 May

**This post may contain affiliate links, which cost you nothing additional, but will buy me a much needed massage.**


We’re heading into the final week of the Jeffrey Court One Room Challenge! You’ve seen the plan, I showed you the challenges we faced with demo, the progress we made along with the additional roadblocks we faced, and now we’re finally starting to tile. I’m not going to lie, I thought this day would NEVER come. Like never ever, ever.

Master Bathroom Refresh

Finally we have tile!!!

 Seconds after I posted last week, the doorbell rang and our shower pan and waterproofing arrived on my doorstep. I may have done a happy dance since just few days before, the order had been lost by another company.  We chose the Schluter-Kerdi shower pan, drain, and waterproofing membrane because of all the amazing reviews. We watched the installation videos a million, maybe just a few, times to get the technique and the order down.

After reading tons of reviews, this is the waterproofing system we chose.

The instructions state that you have to use unmodified mortar to install this system,  as opposed to the pre-made mortar we bought to install the tile. Let me just say that getting the correct consistency is super important. You want it wet enough to give you time to work with the material, but firm enough to hold a trowel line. There were no pictures to demonstrate us doing this part because once we started installing, we were working against the clock and 9 ft shower ceilings. After you get the mortar on the wall, you lay the membrane on and smooth it out. Thankfully we pre-measured and pre-cut the membrane before this project started.

Master Bathroom
Getting the right consistency of the mortar was tricky.
Master Bathroom
Once the Schluter membrane was up, it was necessary to smooth out any air bubbles.

I’ll also say that they guy in the Schluter video is a magical unicorn because he definitely made it look super easy. Granted, I’m sure doing the video wasn’t the first time he had ever installed the system. It’s really a shame that we didn’t video my husband and I installing ours for just pure comedic relief.

I love the tile that we selected from Jeffrey Court.

Once we finished installing the membrane on the shower walls, we basically ran out of weekend. Which means that my husband has to go back to work and I have to do what I can while he’s away. Now that we were done with the heaving lifting, I could focus on installing the tile and I started with the bathtub surround. The tile that we had previously, only went up a few inches above the tub and we decided that we wanted the tile to go up to the window. I raised the sides up as well to keep the lines consistent.

We picked out this beautiful herringbone tile from Jeffrey Court called Linen Breeze, but instead of installing them the standard way, we decided to turn the herringbone and install on the 90 degree angle. To keep the project going I installed everything but the cut pieces. Honestly because of how I laid the tile, there are very few half pieces I’ll have to cut.

We opted for a different spin on the herringbone tile.

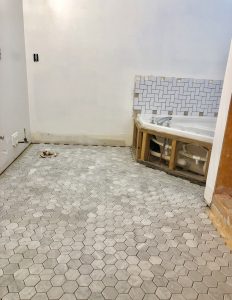
I also started tiling the bathroom floor with the beautiful Statuario Hex White Marble tile and wow did it go so much faster. I love the feel of this tile and cannot wait to get my little piggies on it!

Checking the floor to make sure it’s level will eliminate any high or low spots in your tile.
Master Bathroom
I love the look and the feel of this adorable hex tile.

There’s a third tile choice that goes on the floor of the shower, but you’ll have to wait to see that selection. I’m not trying to be a tease, we’re just not there yet so you’ll for really have to wait to see it.

Oh and I almost forgot to tell you that we also purchased the new vanities!! I did an Instagram poll and the overwhelming response was to get his and hers vanities as opposed to a long vanity like we had before. I think it’s definitely going to pull the vibe I’m shooting for as well as give us both our own designated storage spaces.

To maximize the storage without taking up the space, we decided on these his and hers vanities.


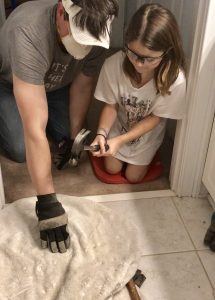
That’s where we are and time is of the essence. We will be tiling, sealing, grouting, cleaning, and decorating for the next few days. I can definitely feel the pressure, but I also feel so much love. My girls have been such troopers and have even had their chance to be a part of this challenge aside from just being on dog duty during the weekends. Friends and family have sent me messages cheering me on along the way and at just the right times I might add.

Master Bathroom
Teaching our kids the ins and outs of DIY has always been a dream of mine.
Master Bathroom
Teaching my oldest daughter how to use a drill has been my dream.

Coming off of our home office renovation, which I had to stop to get the One Room Challenge under way, I’m almost major renovation-ed out. Although I did equate major DIY projects to child birth. In the moment I’m screaming “I’m not doing this for a LONNNNNNGGG time”, but when it’s over I’ll be like “that wasn’t so bad”. *sigh*

These vanity lights were well worth the work to install them.

Next week is it! I have been honored to be a part of this competition and have loved hearing the judges commentary along the way. I’m not going to lie, when it’s over, I may sleep until June.

XOXO,

Brooke

Coming into the final week of the competition!

Let's connect!!

Stay connected for all your DIY and organizing needs!

Success! Now check your email to confirm your subscription.

There was an error submitting your subscription. Please try again.

We won't send you spam. Unsubscribe at any time. Powered by ConvertKit

« One Room Challenge – Master Bathroom Progress
One Room Challenge – Master Bathroom Reveal »

Hi, I'm Brooke! Welcome to my little corner of the web where I share my (hopefully) helpful tips about how I'm navigating through life, one organizing and DIY project at a time. Come on in, make yourself comfortable, and let's get to work!

Let’s Connect

  • Facebook
  • Google+
  • Instagram
  • Pinterest

Stay Connected

Features

Featured on Hometalk.com

cribbsstyle

Lover of DIY• Organizing Nerd• Chaos Coordinator• Momma of 2• Wife• Living the dream in Charleston, SC •
brookecribbs@live.com

Brooke Cribbs
From early in my relationship with Courtney, we lo From early in my relationship with Courtney, we loved going to open houses and parade of homes. Anything to get ideas and inspiration on what we wanted in our own home. Believe it or not, we’ve moved 10 times. Of those 4 were homes we bought and one of them a home we built. Needless to say when we saw the online photos of our “hopeful” future home plan, we agreed we had at least one more move in us.  What’s something you’re looking for in your next home?
In my lifetime of doing DIY, I’ve picked up a fe In my lifetime of doing DIY, I’ve picked up a few tips and tricks along the way. #partner Check out the link in my profile for my first @homesdotcom article of the year where I share all my juicy secrets. 🙌🏽
I needed to take a long break after last week to p I needed to take a long break after last week to process all that’s going on. I’m still processing. One of my favorite things to do is take long walks through construction sites surrounded by plumbing and framing.  No lie. This is where we’ve gone multiple evenings over the last couple of weeks. This place has brought us a lot of peace and on the blog I’m spilling the beans on our secret.
I had to do it too and pull up my top nine from th I had to do it too and pull up my top nine from this year. And I’m not surprised by what’s there. The tragic helicopter accident that took Kobe, his daughter, and their friends rocked me in a way I didn’t know it would.  It was clear that y’all loved the bedroom renovations this year and our @wearewoodgrain accent wall was a huge crowd favorite. Kennedy’s diamond pattern wall is one of my most pinned on Pinterest to this day. I’m deep in planning mode for this year and can’t wait to bring more fun content. Hope that everyone had a great night and an even better weekend!!
Walking out of this year with a whole new perspect Walking out of this year with a whole new perspective. While this year was filled with so much uncertainty, I was still able to find some light and a more clear vision. (I’ve always said the best lessons come in the valleys of life.) I’ve spent the last few weeks with Court and the girls and I’ve come to some realizations that will change the vision I thought I had for the future. I thank you for being on this journey.  I’m blown away by the people I’ve met online and in person from this community.  The opportunities I’ve been blessed to experience.  I pray that everyone has a safe night and we all wake up tomorrow with hope that the new year will bring more peace.
Christmas is only two days away, but there’s sti Christmas is only two days away, but there’s still plenty of time to make one of the perfect handmade holiday courtesy of  the @homedepot! Home Depot doesn’t just focus on big DIY projects, they have all the supplies to help you with your smaller personalized DIY projects too! From stencils to wood shapes they can help you bring your handmade gifts to life. Looking for more holiday DIY gift ideas?  Don’t forget to check the link in my bio for other great DIY Holiday Handmade Ideas  to make the ones you care about most, smile.  #THDxHoliday #HomeDepotPartner #sponsored #thdxdiyworkshops
The holidays can be a stressful time of year, and The holidays can be a stressful time of year, and this year is no exception. If you’re looking for a last minute, budget friendly, and sentimental gift, the @homedepot has you covered! What better way to show someone you care, than with a thoughtful homemade gift.  Check out the link in my bio for all the other amazing DIY homemade holiday gift ideas. Also, be sure to check out my blog and how I took @_ashleighlaurn lazy susan tutorial and put my own personal spin on it. (See what I did right there?) 😉 #homedepotpartner #thdxholiday #sponsored #thdxdiyworkshops
Remember that sweet three tiered tray from Decor S Remember that sweet three tiered tray from Decor Steals? Here she is all decked out for Christmas! Speaking of Christmas, I some how misplaced my favorite Christmas t-shirt. I spent the better part of the night tearing my closet apart.  No dice. But at least my kitchen’s cute. 😉
Load More...

The bottom line

All work is Copyright of Cribbs Style and are solely the opinion and suggestion of Cribbs Style. Any links to affiliate sites could result in payment to me, but my honest opinion will be given in regards to the products. You are more than welcome to use one picture as long as you link back to this site and please do not crop out any watermarking.

Copyright © 2021 · Refined theme by Restored 316