Home Office Refresh- Rustic Industrial Desk
**This post may contain affiliate links, which if you shop them cost you nothing additional, but allows me to buy more colorful pens.**
Most of the home projects that we do have come out of necessity. It’s like playing the game “If you could change anything, what would it be?” except in real life. Basically the whole reason for doing our home office makeover came from our need for a huge desk. After months of denial, my computer armoire wasn’t going to cut it anymore.
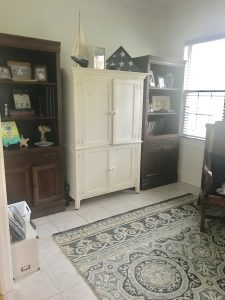
Every night when the girls come home from school, they have a routine of dismantling their back packs and in the flurry of “how was your day?”… “what cool thing did you discover?” … the girls would settle into their homework at the family dinner table. Which was great because as I would cook dinner, and by cook I mean heating up stuff in the microwave, we were all in the same space. However, when it was time to eat dinner, sometimes they weren’t finished with their homework, but would need to clear off the table. Yet there would be the straggling pencil and glue stick amongst the bottles of ketchup and mustard. (We keep it fancy up in here.)

It was such a waste of time for them to pack everything up and then have to put everything back out when we were done eating. Especially when we had a space that was ideal for us to use for this very situation, my office. I told my hubby that on the wall opposite of the built in cabinets, I wanted a desk that would span wall to wall. Knowing that to find a desk pre-made that would fit the space would be the equivalent to finding a unicorn, we moved to the next idea, to build one.
I wanted it to be a solid surface and also solid wood, not plywood, because I wanted to stain it to match the counter on the built ins. We had so much going on with the shiplap and of course the built in cabinets, not to mention some other odds and ends, that I didn’t want to spend too much time, or money, to make the ginormous desk happen. On one of our trips to Lowe’s to pick up supplies, we stumbled upon ready cut pieces of wood that were 24 inches deep and 72 inches wide. The space we needed to cover was 117 inches, which meant we would have to cut 13.5 inches off of both boards to keep the line in the middle of the space.
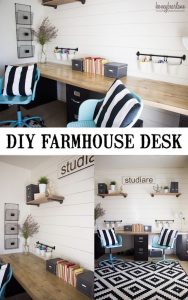
We found our wood, now what would we do about the base? We had measured the space from the floor to the desk on the armoire so we knew how high we needed the base to be. Aside from aesthetics, it needed to be sturdy, especially if my kiddos were going to use the space. Then I found these pictures and I knew that this is the direction I wanted to take, because again, I didn’t want to build anymore than I had to. Plus, extra storage isn’t a bad idea when it wasn’t going to be just me using this space.
I searched high and low and wouldn’t you know it, my local Walmart didn’t disappoint. We found three of the same file cabinets that would provide storage: hers, his, and the kids. Here is a similar one from Amazon:

To be safe we measured the space again, measured the wood, and cut equal parts off of the wood so the seam would meet in the middle. We added wood glue and pocket holes to connect the two pieces, but realized, that wouldn’t be enough to make the seam sturdy. (Darn you physics!) Thankfully I had a package of mending braces on hand and we used those to support the seam from the under side of the two pieces.


Potential disaster averted! I filled the gap with stainable wood putty, then we sanded!
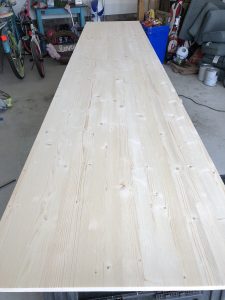
I applied my go to stain of Rust-Oleum Weathered Gray, followed by Minwax Special Walnut and as we waited for it all to dry before we applied the polyurethane, a red flag went up.
Because of where we wanted the desk, we forgot to account for the window frame!!! GASP!!!! I alerted the hubster and we moved the ginormous piece of wood into the study. I had the idea to lift the board up so it rested under the window frame, marked with a pencil the outline of the window frame, then we carried the large piece of wood back out to the garage. It was there that I cut the wood with our Ryobi Jigsaw and wouldn’t you know it, I damaged the crap out of the cut. Nothing a little sanding, a whole lot of praying and stain couldn’t cover.
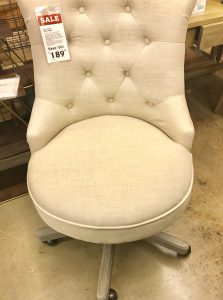
After the polyurethane dried, we moved the wood back in, recruited the girls to help us as we slid the three file cabinets in place then viola, we had a desk. I found the most perfect and comfy chairs, the Elsie at World Market to finish the space.
This was definitely one of those “why didn’t we do this sooner projects?”. Aside from my home office for blogging, a place for the girls to study after school, we also needed a place for my husband to work on his hospital stuff. Now at night, after we put the girls to bed, we both can work and talk together in the office.

The desk all in total cost about $250 between the wood and the base cabinets. I seriously doubt we could have found a desk in the size we needed for the same price. Do it yourself wins again!
If you’re keeping track, we finished the shiplap, built in storage cabinets, and now finished the desk. All that’s left is to finish decorating! At least now the HUGE bulk of the project is done and I can retire my corner couch office and work in this amazing space. Can I get an “Amen”?!
XOXO,
Brooke
P.S. Don’t forget to sign up below to stay in the know.

Let's connect!!
Stay connected for all your DIY and organizing needs!






This makeover looks amazing!!! I love those chairs so much!!!
Thank you!!! The chairs were definitely a must and I’m so happy I stuck to my plan and got two matching chairs!
That looks amazing. You always give me a ton of inspiration!
Thank you so much, that makes me so happy!!!!