Cribbs Style

  • About
  • Blog
  • Let’s Connect!
  • Privacy Policy and Disclosure

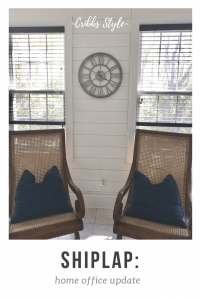
Home Office: Shiplap…Round 3

DIY· Farmhouse· Home Office· Ideas· Paint· Shiplap Walls· Tips· Woodworking

21 Mar

**This post may contain affiliate links which are no additional charge to you, but help me buy more brad nails since apparently we’re shiplapping all the things.**

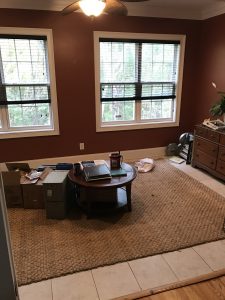
If you read my recent post about the beginning of our home office renovation, I mentioned that we shiplapped an ENTIRE room! You also know that I only wanted an accent wall, but it’s ok, I’m not bitter or anything. If you’ve read my other post about how we did shiplap, you’re probably wondering why I’m talking about it again, but this time we did things completely different!

home office, shiplap, farmhouse
A wall of windows that is having a hard time bringing in light to this really dark space.
Home office, shiplap, farmhouse, coastal farmhouse
A little farmhouse, a little industrial, a little coastal.

The other two projects we started at the bottom, but this time we started at the top. When you walk into a room our tendency is to look up and it’s more appealing to the eye if all the boards are the same width. Wouldn’t you know it, the very last row in our home office ended up being a little more than an inch wide as opposed to the other boards that were 6 inches wide. ( Plus apparently it’s how you’re “suppose” to do it according to other people. 😉 )

Shiplap, farmhouse, coastal farmhouse
Our first shiplap project in the pantry we wanted full length boards and started at the bottom.
Shiplap wall, farmhouse, rustic, pantry, foyer
Shiplap wall foyer progress.
Home office, shiplap, farmhouse, coastal farmhouse.
First couple rows of shiplap complete!

We also didn’t just do one wall at a time, instead we went around the room and did every wall row by row. Round and round we went. Why, well we are still a little scarred by the foyer fiasco where the boards didn’t match up and I didn’t want to take that risk again.  By going around the room instead of focusing on one wall at a time, we ensured that everything was level and the corners matched up perfectly.

This project required 9 total plywood boards and we cut them all down with our Kreg Rip Cut Jig and Ryobi Circular Saw. Like I’ve said before, the jig was amazing to guarantee that every board was the same 6 inch width every time. We cut the boards down the long side of the plywood to cover as much space as possible, but also paying attention to stagger the boards so it didn’t look too uniform around the room.

Home Office, shiplap, farmhouse, coastal farmhouse
Slowly but surely making our way around the room.
Home office, shiplap, farmhouse, coastal farmhouse.
First two shiplapped walls completed!
Home office, shiplap, farmhouse, coastal farmhouse.
There is no better feeling than when you put the last nail in the wall.

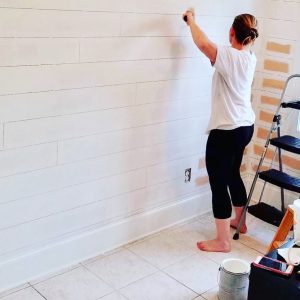
To keep with a more authentic and rustic look, we made the gap in between the boards using the same spacing with nickels like we use to space the boards when we add another row. It took extra hands and more nickels to hold everything in place while we were nailing. Oh and I also asked YOU what we should do about all the nail holes and overwhelmingly y’all agreed, we should leave them. (Which I could hug you all for agreeing with me because after putting in well over 1000 nail holes I was not feeling the urge to wood fill all. those. holes.) At first the hubby wasn’t on board, but when I showed him the results of the poll, he agreed. Granted I had to show him multiple times and I would make comments like “oh look one more person agrees with me.” Guess what, we both love it!

I guess you could say third time was a charm. We definitely applied all the hard lessons we learned with the last two projects and this go at the shiplap went a lot smoother. However, I have no plans on putting shiplap on anything else any time soon and my husband’s design input is grounded at the moment. Even he at one point tried to say thought maybe an accent wall would have been enough and he’s lucky I wasn’t holding the brad nailer at the time he said it. (Kidding…. sort of.)

Home office, shiplap, farmhouse, coastal farmhouse.

The most satisfying part of the project, painting the shiplap and breathing new life into this space.

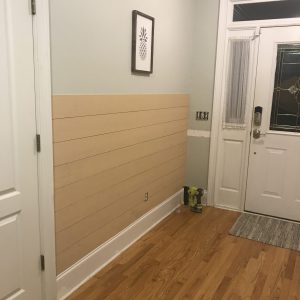
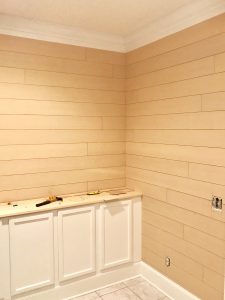
I should also mention that we did the built in cabinets first before we did the shiplap. No point in putting shiplap where no one would see it. This leads to the next topic…  Are you ready to hear how we did the built in cabinets? Stay tuned! Here’s a teaser picture and a shot of some of the finished shiplap.

Home office, shiplap, farmhouse, coastal farmhouse

I am so ready to have my office back because I’m head over heels in love with this space!

If you have any questions, or have any other design ideas I’m currently taking submissions from someone other than my husband. (Totally kidding babe, I love you, but seriously you’re still grounded.)

XOXO,

Brooke

Home office, shiplap, farmhouse, coastal farmhouse.

Shiplap take 3!

Let's connect!!

Stay connected for all your DIY and organizing needs!

Success! Now check your email to confirm your subscription.

There was an error submitting your subscription. Please try again.

We won't send you spam. Unsubscribe at any time. Powered by ConvertKit

« Home Office – What I’m doing and where have I been
Clutter Free Home Organization Challenge- Master Bedroom »

Comments

  1. julie|icanlivewithoutsugar.com says

    March 21, 2018 at 10:04 pm

    Hi Brooke,
    Round 3 – you’ve been super busy and it has paid off. Everything looks gorgeous. I love, love, love, country farmhouse style – can’t get enough of it. Can’t wait to see more of your projects!

    • Brooke says

      March 22, 2018 at 12:10 pm

      Thank you so much Julie!! It has been a lot of work, but a lot of fun at the same time! Can’t wait to get in there and actually work!!

Hi, I'm Brooke! Welcome to my little corner of the web where I share my (hopefully) helpful tips about how I'm navigating through life, one organizing and DIY project at a time. Come on in, make yourself comfortable, and let's get to work!

Let’s Connect

  • Facebook
  • Google+
  • Instagram
  • Pinterest

Stay Connected

Features

Featured on Hometalk.com

cribbsstyle

Lover of DIY• Organizing Nerd• Chaos Coordinator• Momma of 2• Wife• Living the dream in Charleston, SC •
brookecribbs@live.com

Brooke Cribbs
From early in my relationship with Courtney, we lo From early in my relationship with Courtney, we loved going to open houses and parade of homes. Anything to get ideas and inspiration on what we wanted in our own home. Believe it or not, we’ve moved 10 times. Of those 4 were homes we bought and one of them a home we built. Needless to say when we saw the online photos of our “hopeful” future home plan, we agreed we had at least one more move in us.  What’s something you’re looking for in your next home?
In my lifetime of doing DIY, I’ve picked up a fe In my lifetime of doing DIY, I’ve picked up a few tips and tricks along the way. #partner Check out the link in my profile for my first @homesdotcom article of the year where I share all my juicy secrets. 🙌🏽
I needed to take a long break after last week to p I needed to take a long break after last week to process all that’s going on. I’m still processing. One of my favorite things to do is take long walks through construction sites surrounded by plumbing and framing.  No lie. This is where we’ve gone multiple evenings over the last couple of weeks. This place has brought us a lot of peace and on the blog I’m spilling the beans on our secret.
I had to do it too and pull up my top nine from th I had to do it too and pull up my top nine from this year. And I’m not surprised by what’s there. The tragic helicopter accident that took Kobe, his daughter, and their friends rocked me in a way I didn’t know it would.  It was clear that y’all loved the bedroom renovations this year and our @wearewoodgrain accent wall was a huge crowd favorite. Kennedy’s diamond pattern wall is one of my most pinned on Pinterest to this day. I’m deep in planning mode for this year and can’t wait to bring more fun content. Hope that everyone had a great night and an even better weekend!!
Walking out of this year with a whole new perspect Walking out of this year with a whole new perspective. While this year was filled with so much uncertainty, I was still able to find some light and a more clear vision. (I’ve always said the best lessons come in the valleys of life.) I’ve spent the last few weeks with Court and the girls and I’ve come to some realizations that will change the vision I thought I had for the future. I thank you for being on this journey.  I’m blown away by the people I’ve met online and in person from this community.  The opportunities I’ve been blessed to experience.  I pray that everyone has a safe night and we all wake up tomorrow with hope that the new year will bring more peace.
Christmas is only two days away, but there’s sti Christmas is only two days away, but there’s still plenty of time to make one of the perfect handmade holiday courtesy of  the @homedepot! Home Depot doesn’t just focus on big DIY projects, they have all the supplies to help you with your smaller personalized DIY projects too! From stencils to wood shapes they can help you bring your handmade gifts to life. Looking for more holiday DIY gift ideas?  Don’t forget to check the link in my bio for other great DIY Holiday Handmade Ideas  to make the ones you care about most, smile.  #THDxHoliday #HomeDepotPartner #sponsored #thdxdiyworkshops
The holidays can be a stressful time of year, and The holidays can be a stressful time of year, and this year is no exception. If you’re looking for a last minute, budget friendly, and sentimental gift, the @homedepot has you covered! What better way to show someone you care, than with a thoughtful homemade gift.  Check out the link in my bio for all the other amazing DIY homemade holiday gift ideas. Also, be sure to check out my blog and how I took @_ashleighlaurn lazy susan tutorial and put my own personal spin on it. (See what I did right there?) 😉 #homedepotpartner #thdxholiday #sponsored #thdxdiyworkshops
Remember that sweet three tiered tray from Decor S Remember that sweet three tiered tray from Decor Steals? Here she is all decked out for Christmas! Speaking of Christmas, I some how misplaced my favorite Christmas t-shirt. I spent the better part of the night tearing my closet apart.  No dice. But at least my kitchen’s cute. 😉
Load More...

The bottom line

All work is Copyright of Cribbs Style and are solely the opinion and suggestion of Cribbs Style. Any links to affiliate sites could result in payment to me, but my honest opinion will be given in regards to the products. You are more than welcome to use one picture as long as you link back to this site and please do not crop out any watermarking.

Copyright © 2021 · Refined theme by Restored 316