How to fix a cracked tile.
Coming into week 2 of the $100 room challenge and already we face our first real challenge. Cracked tile.
When we bought our home almost 4 years ago, we didn’t question that the sellers were leaving their washer and dryer behind. Until we decided to upgrade the washer and dryer.
The dryer is gas.
You can’t just order a gas dryer and have it delivered and installed; it’s a whole process. It has to be special ordered, a plumber has to inspect your gas line, it gets delivered, but the plumber has to come back to install the dryer. It took over a month. A very frustrating month.
Last week when I showed you the cracked tile in the laundry room, one would have thought that in that whole process of buying the new washer and dryer, we should have replaced the floor. But to be honest the whole dryer debacle threw us for a loop and we weren’t ready to do that kind of a project just yet. (I also vowed that if we ever had to get a new set, I was converting the house to an electric dryer anyway.)
**This post may contain affiliate links, which cost you nothing extra, but help me maintain this site.**
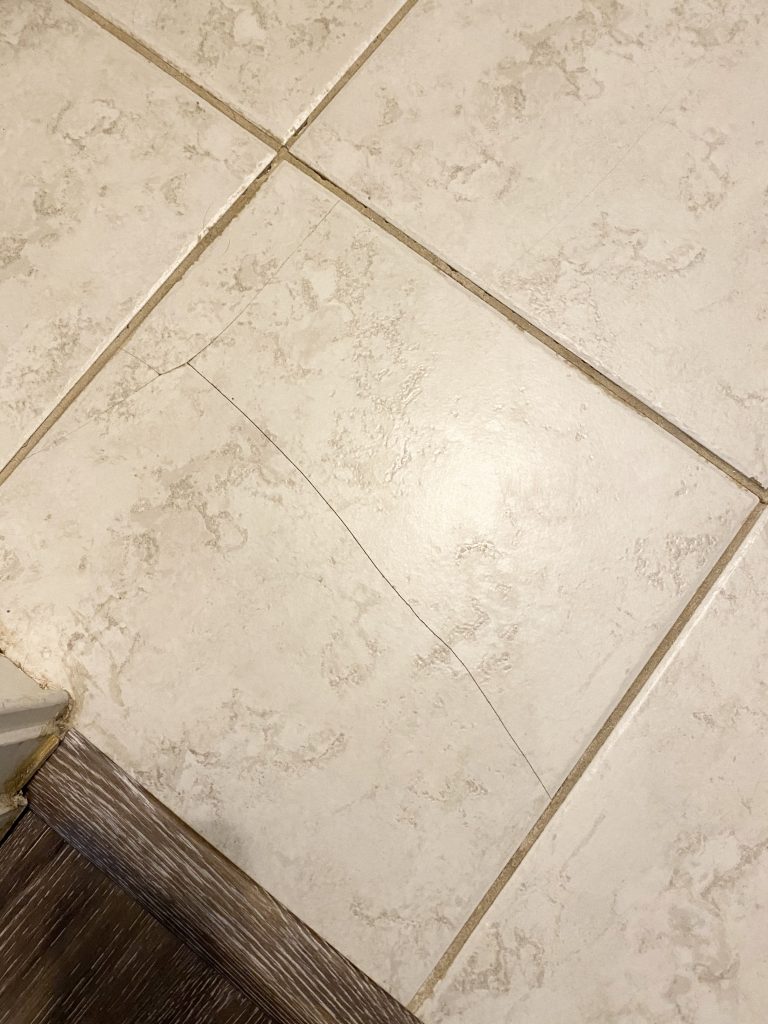
Back to the cracked tile.
Another fun fact, the original tile installed in this house is 13 x 13. Most standard tile these days are 12 x 12. I did find one 13 x 13, but it would have been obvious that it was a different tile all together. My only choice left since I’m not replacing the flooring, was to fix the tile.
Do the research
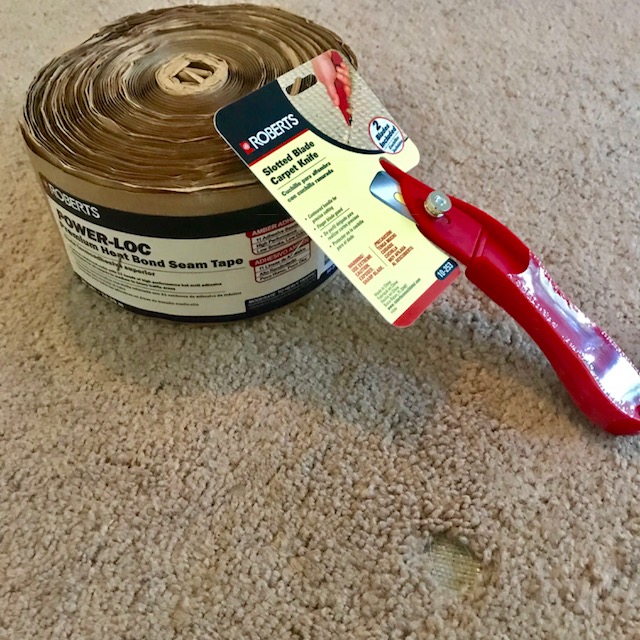
I hit the inter-webs and found a product that everyone raved about. Used mostly to fix tiles that have lifted from the mastic, but figured would also work in this situation as well. The whole reason the tile cracked was because it came away from the

- Clean the tile
- Drill a hole in the grout

- Fill in the holes with fix a floor
- Cure for 24 hours with a weighted object on top

- Fill in grout (I prefer premixed.)
Now to address the actual crack.
I am going to paint over this whole floor and add a stencil, but I do want the crack itself to disappear. I found another highly rated product for filling in the crack lines.

I don’t need it to look perfect in this instance, just make it blend in so I can paint.

That’s where we are with week 2 of the $100 Room Challenge, so let’s see where we are with the budget.
Fix a floor– $10.68
Crack repair– $14.97
Grout- $11.47
Total spent: $37.12
Total left: $62.88
Now we’re ready for the fun part, brining this floor to life!! Don’t forget to check out the progress on all of the other $100 Room Challenge participants.
Best,
Brooke
Let's connect!!
Stay connected for all your DIY and organizing needs!


Pretty smart idea- using a filler to fix that crack! Isn’t the “inter-webs” amazing 😉 Can’t wait to see your floor finished.
I have found so many amazing products out there!
Great tip! need to keep this in case I crack a tile for my next phase of this challenge.
It was such a life saver for sure.
I’m so glad you shared this! One of our tiles has a strange chunk out of it…probably from my rowdy boys! I will look into these products to repair it!
Let me know how it goes!!