Cribbs Style

  • About
  • Blog
  • Let’s Connect!
  • Privacy Policy and Disclosure

DIY Faux Roman Shades

Crafts· DIY· Farmhouse· Inexpensive Home Decor· Kitchen

13 Feb

**This post may contain affiliate links that are of no additional cost to you, but allows me to buy more drop cloths.**

The inspector who looked at our house before we bought it, said that we may want to think about replacing our kitchen window because the top part was a little cloudy.  He said that it didn’t appear to have any cracks or be leaking any air, just more something to think about. Right now it’s on the list of home improvements, but I’ll be honest, it’s not really at the top of the list. This window also lets in a good amount of light, but sometimes too much light. Like blinding, you walked in front of headlights, kind of bright. That’s when I got the bright idea, get it, to put up curtains, but I wasn’t sure I wanted to fully commit.

DIY, faux roman shades

How to DIY faux roman shades.

In our master bedroom I used drop cloths to make really long and inexpensive curtains. Each panel was about $13 a piece and I had plenty of left over fabric after I hemmed the bedroom curtains to the length I needed. What was included in this left over fabric, were three “finished” or already sewn sides. I thought about making a valance, but my husband thought that maybe a roman shade would look better. (I know you may be shocked, but honestly hubby knows a lot about decor. That and he discovered Pinterest last year.) Knowing that we would never pull it down because there is a wooded area outside the window, I decided to go for the look of a roman shade instead. I’ve seen tutorials where people have cut apart blinds and attached fabric, but this particular window had no window treatments at all. Not sure if this window treatment would be the answer we were looking for, I decided to go with an idea that was faux and less commital. Since I didn’t want to screw anything into the trim or the walls, our answer would lie with tension rods.

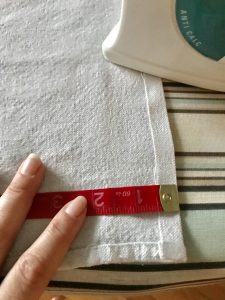
First thing I did was measure the length and the width of the window. Unfortunately, but no big deal, I could only use two of the three finished edges as the window wasn’t as wide as the fabric. I already knew that I was going to have to sew a pocket at the top of the fabric for the tension rod to slide through and hold the fabric up. To account for the pocket, I added 2 inches to the length of the fabric.  To make the finished edge of the width, I added an extra inch, and I cut the fabric according to those two measurements.

For the width, I folded the fabric over 1/2 of an inch and ironed the fabric into place. I then folded the fabric over another 1/2 of an inch and again ironed the fabric. This made a crisp edge and looked just like the other side of the fabric.

DIY, faux roman shade
Measuring 1/2″ for the finished edge of the faux roman shade.
DIY, faux roman shade.
New finished edge for the side of the faux roman shade, ready to be sewn.


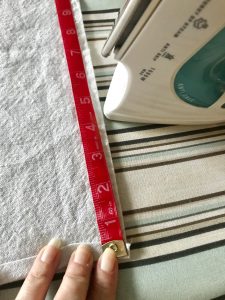
With the length, I folded the fabric over 1/2 of an inch and then again 1 full inch to make the pocket big enough for the tension rod to slide through. I used my sewing machine to do a straight stitch on both folded pieces to give the fabric a finished look.

DIY, faux roman shade
Fabric folded over 1/2″ to give a finished edge when making the pocket for the tension rod in the faux roman shade.
DIY, faux roman shade
Folding over the fabric one inch to allow for the tension rod to slide through. This will hold the fabric in the window for the faux roman shade.

DIY, faux roman shade.

The left side is the edge that I sewed and the bottom was the already sewn seam that was on the drop cloth.

**SIDE NOTE**

If you don’t have a sewing machine, you can still do the above steps, but instead you can use seam tape to bond the fabric together. You won’t have a finished sewn edge, but unless someone is right up on your curtains, they’re not going to notice this missing piece. Your secret is safe with me. 😉

For this project I needed a total of 4 tension rods. To do the installation I slid one of the tension rods into the pocket and placed it into the widow to check and make sure there were no issues with the fabric to reaching the other side or that I wouldn’t have enough fabric to do the next steps. Once everything was fine, I added three additional tension rods spaced evenly, or as close to evenly, apart.

DIY, faux roman shade

Three tension rods spaced evenly apart will serve as the back bone for the faux roman shade.

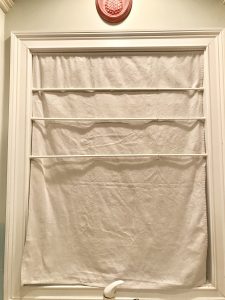
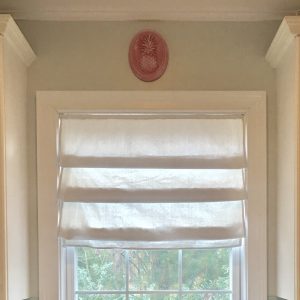
Using a hand on either side of the fabric, I pulled it until it draped just over the first rod at a length that I liked. I continued working my way down to the next two rods pulling and draping the fabric over the rods. I left a little bit of fabric hanging at the end. I’m not gonna lie, I was very pleased with the way it turned out and I loved that there was still a decent amount of light that could still get through the fabric.

DIY, faux roman shade

Fabric pulled over the first of the three tension rods for the DIY faux roman shade.

You don’t have to use drop cloths, you could use any other type of fabric that matches your decor better. I just chose the drop cloth because I liked the way it looked in our bedroom and I already had it on hand. All in total I only had to invest about an additional $12 for all the tension rods. Purchasing a real roman shade could cost you well over $100. If we decide that we don’t like this style after all, I can just take it down, no big deal.

DIY, Faux roman shade

The finished DIY faux roman shade. Still lets in a good amount of light, while hiding the ugly part of the window.

If you love easy projects that make a big impact and you don’t want to miss out, you can subscribe here! Also, don’t forget to share this with your DIY craft loving friends too!

XOXO,

Brooke

Let's connect!!

Stay connected for all your DIY and organizing needs!

Success! Now check your email to confirm your subscription.

There was an error submitting your subscription. Please try again.

We won't send you spam. Unsubscribe at any time. Powered by ConvertKit

« Clutter Free Home Challenge- Kids Closet
How to Paint Cabinets (Not Just For Your Kitchen) »

Hi, I'm Brooke! Welcome to my little corner of the web where I share my (hopefully) helpful tips about how I'm navigating through life, one organizing and DIY project at a time. Come on in, make yourself comfortable, and let's get to work!

Let’s Connect

  • Facebook
  • Google+
  • Instagram
  • Pinterest

Stay Connected

Features

Featured on Hometalk.com

cribbsstyle

Lover of DIY• Organizing Nerd• Chaos Coordinator• Momma of 2• Wife• Living the dream in Charleston, SC •
brookecribbs@live.com

Brooke Cribbs
From early in my relationship with Courtney, we lo From early in my relationship with Courtney, we loved going to open houses and parade of homes. Anything to get ideas and inspiration on what we wanted in our own home. Believe it or not, we’ve moved 10 times. Of those 4 were homes we bought and one of them a home we built. Needless to say when we saw the online photos of our “hopeful” future home plan, we agreed we had at least one more move in us.  What’s something you’re looking for in your next home?
In my lifetime of doing DIY, I’ve picked up a fe In my lifetime of doing DIY, I’ve picked up a few tips and tricks along the way. #partner Check out the link in my profile for my first @homesdotcom article of the year where I share all my juicy secrets. 🙌🏽
I needed to take a long break after last week to p I needed to take a long break after last week to process all that’s going on. I’m still processing. One of my favorite things to do is take long walks through construction sites surrounded by plumbing and framing.  No lie. This is where we’ve gone multiple evenings over the last couple of weeks. This place has brought us a lot of peace and on the blog I’m spilling the beans on our secret.
I had to do it too and pull up my top nine from th I had to do it too and pull up my top nine from this year. And I’m not surprised by what’s there. The tragic helicopter accident that took Kobe, his daughter, and their friends rocked me in a way I didn’t know it would.  It was clear that y’all loved the bedroom renovations this year and our @wearewoodgrain accent wall was a huge crowd favorite. Kennedy’s diamond pattern wall is one of my most pinned on Pinterest to this day. I’m deep in planning mode for this year and can’t wait to bring more fun content. Hope that everyone had a great night and an even better weekend!!
Walking out of this year with a whole new perspect Walking out of this year with a whole new perspective. While this year was filled with so much uncertainty, I was still able to find some light and a more clear vision. (I’ve always said the best lessons come in the valleys of life.) I’ve spent the last few weeks with Court and the girls and I’ve come to some realizations that will change the vision I thought I had for the future. I thank you for being on this journey.  I’m blown away by the people I’ve met online and in person from this community.  The opportunities I’ve been blessed to experience.  I pray that everyone has a safe night and we all wake up tomorrow with hope that the new year will bring more peace.
Christmas is only two days away, but there’s sti Christmas is only two days away, but there’s still plenty of time to make one of the perfect handmade holiday courtesy of  the @homedepot! Home Depot doesn’t just focus on big DIY projects, they have all the supplies to help you with your smaller personalized DIY projects too! From stencils to wood shapes they can help you bring your handmade gifts to life. Looking for more holiday DIY gift ideas?  Don’t forget to check the link in my bio for other great DIY Holiday Handmade Ideas  to make the ones you care about most, smile.  #THDxHoliday #HomeDepotPartner #sponsored #thdxdiyworkshops
The holidays can be a stressful time of year, and The holidays can be a stressful time of year, and this year is no exception. If you’re looking for a last minute, budget friendly, and sentimental gift, the @homedepot has you covered! What better way to show someone you care, than with a thoughtful homemade gift.  Check out the link in my bio for all the other amazing DIY homemade holiday gift ideas. Also, be sure to check out my blog and how I took @_ashleighlaurn lazy susan tutorial and put my own personal spin on it. (See what I did right there?) 😉 #homedepotpartner #thdxholiday #sponsored #thdxdiyworkshops
Remember that sweet three tiered tray from Decor S Remember that sweet three tiered tray from Decor Steals? Here she is all decked out for Christmas! Speaking of Christmas, I some how misplaced my favorite Christmas t-shirt. I spent the better part of the night tearing my closet apart.  No dice. But at least my kitchen’s cute. 😉
Load More...

The bottom line

All work is Copyright of Cribbs Style and are solely the opinion and suggestion of Cribbs Style. Any links to affiliate sites could result in payment to me, but my honest opinion will be given in regards to the products. You are more than welcome to use one picture as long as you link back to this site and please do not crop out any watermarking.

Copyright © 2021 · Refined theme by Restored 316