Faux Hand Carved Wood Inspired Headboard
**This post may contain affiliate links, which cost you nothing extra, but help me to come up with other fun creative designs. **
You would not believe how easy this faux headboard was to make!
I had every intention on doing a week three update for the $100 Room Challenge hosted by Erin from Lemons, Lavender, and Laundry, but life got in the way and that didn’t happen. Really and truly there wasn’t much to update, so I’m giving myself a heaping helping of grace. This week, I’ve got some exciting news to reveal….
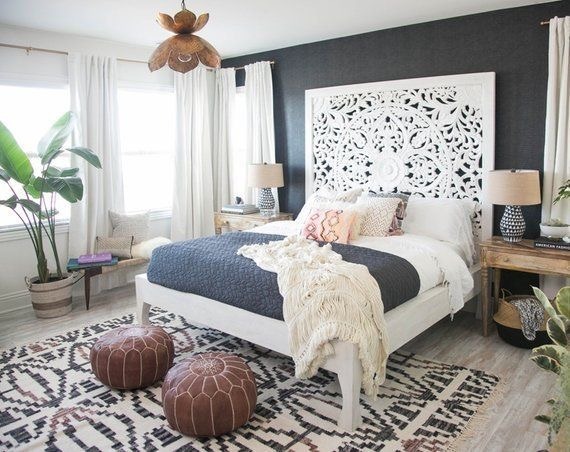
The faux hand carved wood inspired head board is DONE!
Remember the inspiration pictures.
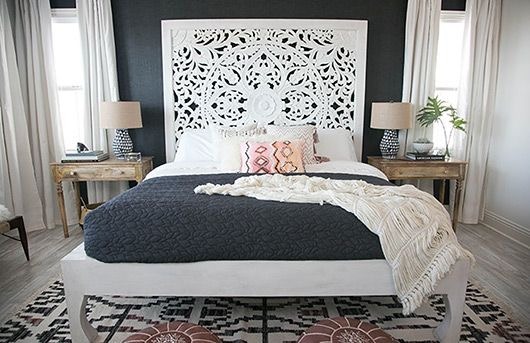
I loved the look of the headboard the most and wanted to figure out a way to recreate it and still stay within the $100 budget. As I said in the inspiration post, buying a headboard similar to this was completely out of the question for this challenge. I did look at buying fabric that had the Mandala already on it, but it felt more college dorm room and not a master bedroom headboard.
Fun Fact: I was a Resident Advisor in college and I’ve seen my share of dorm rooms. It’s also how I met my husband.
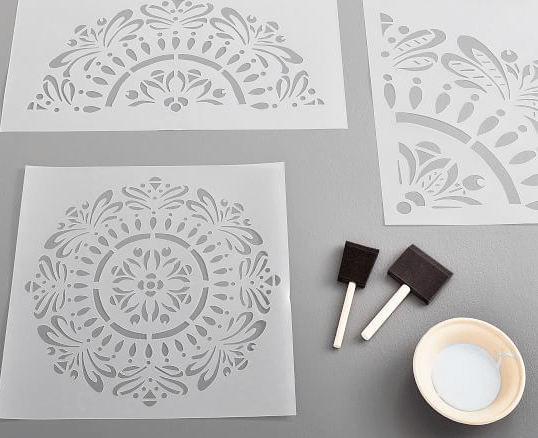
While our love story started in the dorms, it didn’t need to continue to our bedroom. 😉 On my continued search is when I stumbled upon the stencil from PB Teen that was not only perfect, but on sale for $11.99! (Fist pump) Shipping was free, but with a little bit of tax, it was $13.07.
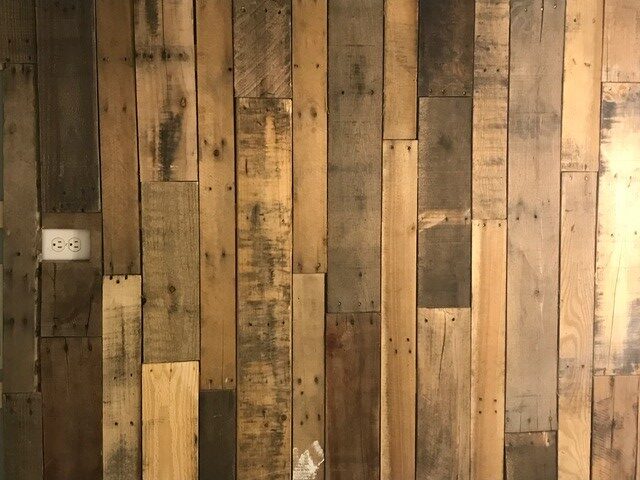
I thought about stenciling on a giant canvas, but whoa that was too expensive. Then, I thought about making my own canvas by stretching drop cloth over a wood form. Except I worried about bleeding and the drop cloth being too hard to work with the stencil. Sitting in my office, I looked up and right in front of my face, the faux shiplap we made out of floor underlayment. BOOM!


I measured our king sized bed and cut the panel down using my Kreg Rip Cut Jig.

I painted two coats of the left over Benjamin Moore White Dove before I moved on to do the stencil. For the stencil, I used the accent wall color so it would look more like hand carved wood. I measured to find the center point of the board. I used the biggest of the three stencils for the middle.
Now it’s time to have fun and be creative!
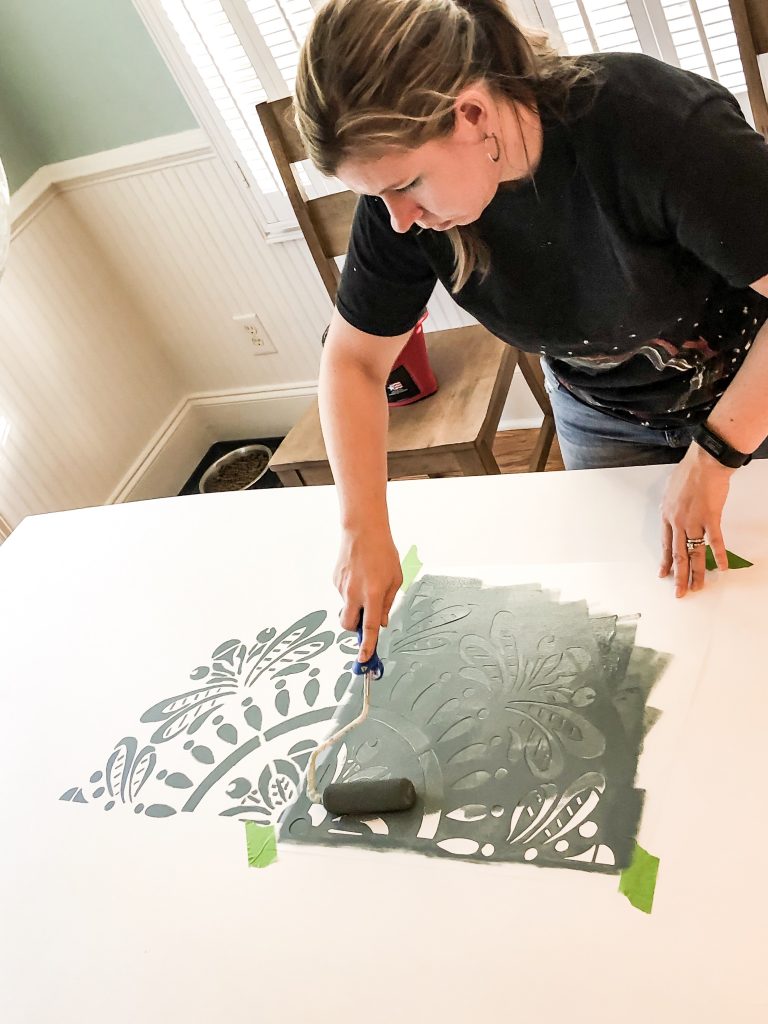
It was super easy to line up the stencil and work my way around the design. I applied a couple coats of the paint using a foam roller and lifted the stencil immediately. I made sure to wipe off the back of the stencil each time after I painted. I didn’t want any paint to transfer from the stencil onto the surface. Frog Tape painters tape, held the stencil down firmly without damaging the painted surface when I removed the stencil.
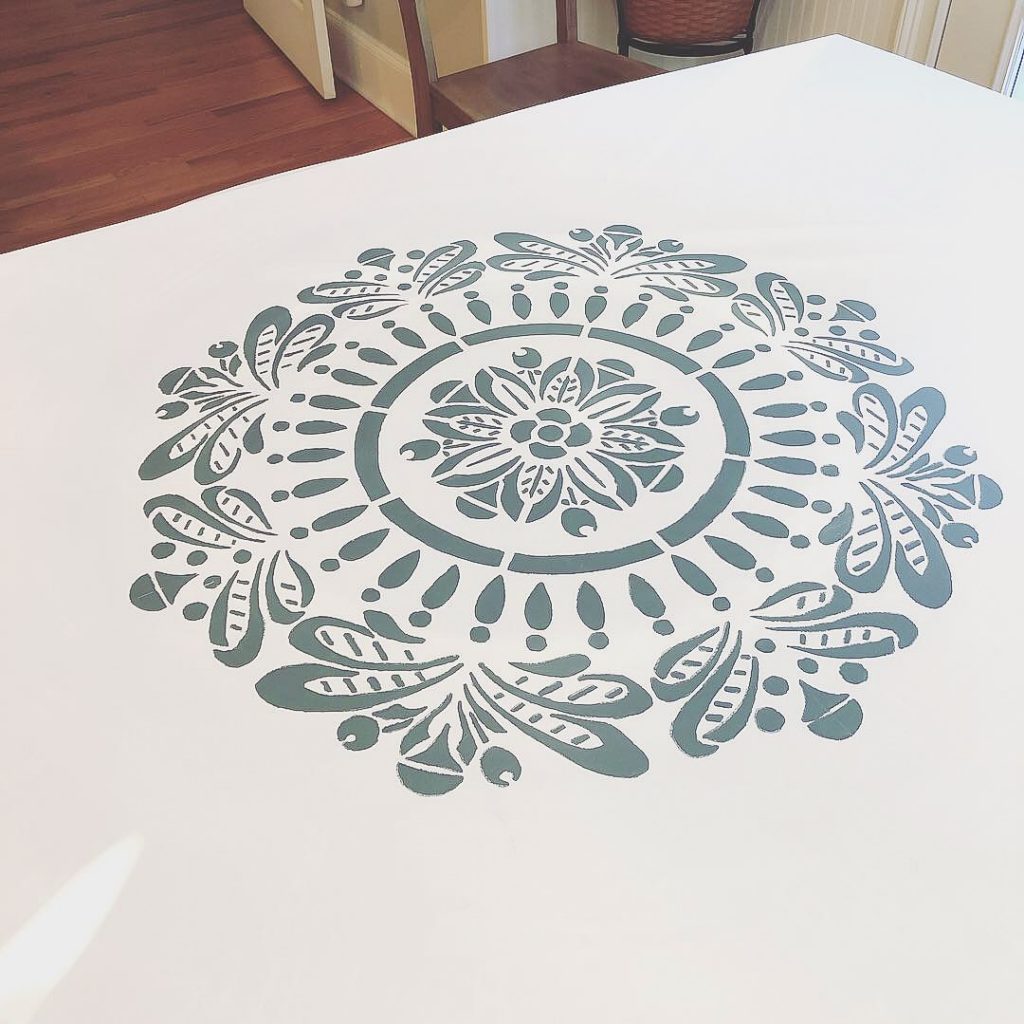
Once the first main mandala was made, I was thrilled!! I didn’t want to take away from the main mandala, so my husband suggested that I move to the next smaller size and work around.

I worked my way around the board repeating the rolling, lifting, and wiping of the stencil. I wanted to make sure that each mandala had a chance to fully dry before I came back to add more.

I kept adding and layering the design until I felt that the board was adequately filled. I was a little surprised how much time it actually took to complete the board. It was relatively easy and I only had a few areas that bled through. However, I didn’t take into account how much dry time I would need.
Now that the “hard part” was over, how did I plan to attach the headboard?
Making sure the board was level and evenly placed, I used my Ryobi brad nail gun, and attached the board to the wall. I placed my nails into the darker parts of the design so you can’t see them.

To give a more of a finished look, I attached 1″ x 3″ pieces of primed MDF to the side and the top of the board. I opted not to do the bottom of the board since it would be behind the pillows and I didn’t want to risk us hitting our heads. For the top of the board, I added a 1″ x 2″ piece of wood to give it more substance. The top of the board also over hangs the side pieces by a half an inch.

Each of the boards also got a coat of paint in the same White Dove color. I used my Ryobi finish nailer to attach the boards to the wall. I added wood filler to cover the holes and touched up the paint so you can’t see the nail holes on the trim.
And just like that, my dream became a reality.
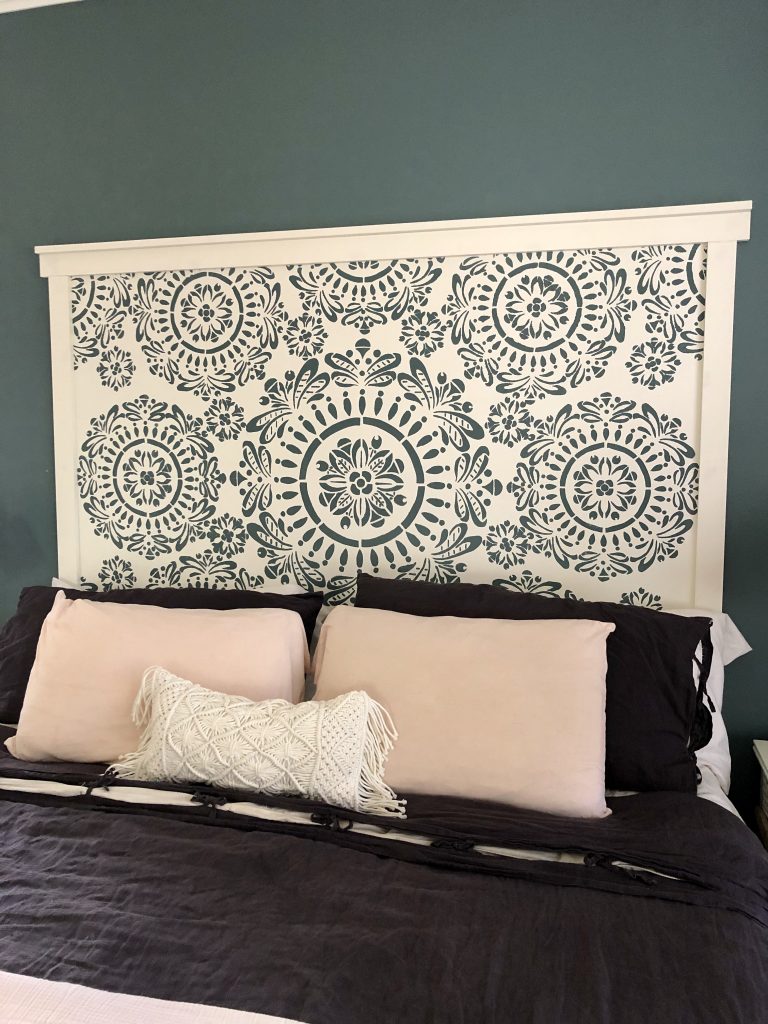
I realize that this isn’t an actual moveable headboard and instead I’m calling it a piece of functional art. Really when you think about it, is there any real purpose of most headboards other than to add a decorative element to your room?

I didn’t want to paint directly onto the wall because I didn’t want to leave a texture to the wall. It’s a lot easier to cover little nail holes than try to work out a stencil design. Using the accent wall color for the stencil paint definitely makes it look like the wall is peaking through the wood.
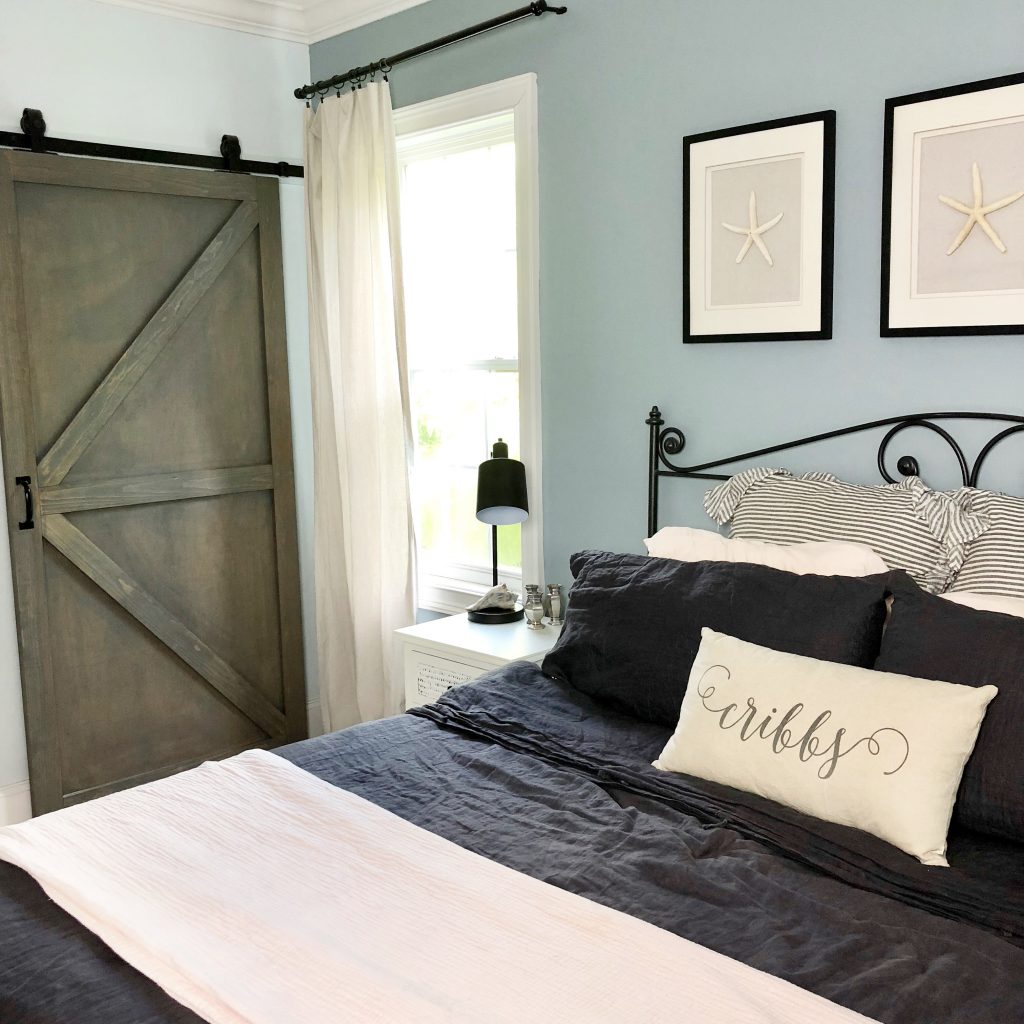
Let’s remember the bedroom before I added the new headboard.
Not to ruin the final reveal, here’s a peak at the bed now. (The rest you can see later.)

Needless to say I am in LOVE with my faux wood carved inspired headboard. All in total it cost $43.67 for the wood and stencil to make this headboard. Some of the paint I had on hand and the other I had to purchase, but it will be figured into the total cost of the room. If you remember from the inspiration post, the real hand carved wood bed cost over $500.
Bonus feature!
Check back next week for the FINAL reveal! Don’t forget to click below and check out the other amazing bloggers who are participating in the $100 Room Challenge!
XOXO,
Brooke
Let's connect!!
Stay connected for all your DIY and organizing needs!

This is a fantastic DIY- it looks amazing! Can’t wait to see the finished room!
Thank you Beth, I can’t wait to show the room either!
This DIY is amazing!! It’s so beautiful and you made it look so easy. Looking forward to seeing the reveal!
Thank you Maria!! Cheers to the final week!
Standing ovation!!!! Without reading this post, I would have never guessed this is a piece of underlayment. Going to share this with my step-mom as she is in need of a headboard. Gosh, you have my mind racing. You actually made me think I could stencil something. Love it!!
Thank you Kelli!! I cannot wait to take on another stencil project soon!
What a simple DIY headboard! That is perfect! Stencil is very cute.
This is brilliant! I, honestly, don’t know if I would have figured out how to turn that original inspiration photo into reality. You did an amazing job! Love it!!!
Erin that is the sweetest compliment!! I am so happy you love it and I am relieved that I was able to make it come to life!