Shiplap Wall Made Simple
**This post contains affiliate links that are of no additional cost to you, but help me to buy a little more wood filler.**
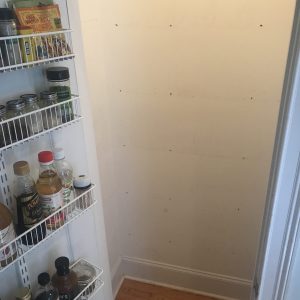
Knowing that our house was built in the early 2000’s and if I peel back the drywall, I am in no way going to find any coveted shiplap walls. A girl can dream, but the next best thing is to create my own shiplap walls, and that’s exactly what I did. Many of my “daring” projects I like to start small, figure out the process, learn from my mistakes, and then take those skills to some place more visible. In this instance I decided to tackle our pantry first. That way if it turned out to be an utter disaster, no one would know the secret but me and the peas. Except I learned a very hard lesson a very hard way…

First things first, we had to select our wood and since we are on a budget, we had to go with something that would be inexpensive, easy to work with, and give us the look that we desired. We literally stumbled upon this underlayment, 8’x4′ primed poplar at $14 a board. We also decided that we wanted the shiplap boards to be 6 inches wide, but where we purchased the wood, they would only do five cuts per person and we needed way more than five. I will say that I am seeing wider planks and really it’s what you prefer and where you get to be super creative, so have fun with your design.

This past summer during my conference, the Kreg booth demonstrated their Rip-Cut Jig and I knew I had to get my hands on that little pretty.

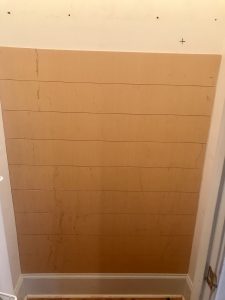
You attach your circular saw to the jig and set your measurements, in our case we set it to 6 inches. Then the jig glides along the side of the piece of wood and you get consistent cuts every time. Cutting the boards was the most labor intensive part of the project so we cut all the wood we purchased before moving on to installation.

Once the boards were cut I used a sander to knock off any rough edges.

I used a Ryobi stud finder to mark the studs in the walls and a Ryobi brad nail gun to attach the wood to the walls into the studs. We started by installing our boards from the bottom and worked our way up. Again this was our preference because we were installing this in an enclosed space and even if there was a mishap at the top, you would have to be inside of the pantry to see it. We are extremely lucky in this house as our baseboards have a bit of a lip so that the wood could rest on top. We used nickels to space the boards and worked our way up the wall.
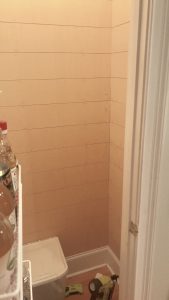
After the boards were installed I used stainable/paintable wood putty to cover ALL the nail holes. Again, personal preference as some people like to leave the nail holes for a more rustic look. I used the same paint I use for our trim as I wanted it to be wipeable and durable.

When we finished, not only was I in love, I also was ready to tackle another area, our foyer. Of course one thing that was a huge help in the painting process was this Handy Paint Pail and liners.

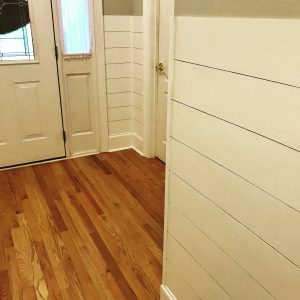
In the foyer I had a vision to do something different. Instead of standard board and batten, I wanted to take shiplap up the wall about 3/4 of the way and cap it off with a 1″x 2″ wood ledge that would be stained a warm wood tone. I would also use the Ryobi finish nailer to attach these boards to the wall because I needed a bigger gauge nail.


After some quick math, we determined that since we were only going partially up the wall and we had some left over wood from the pantry project, we only needed 3 additional sheets of the plywood. In an attempt to save some time, I decided to see if I could convince the gentleman at the home improvement store to cut the three boards down for us. And that’s where things went wonky.
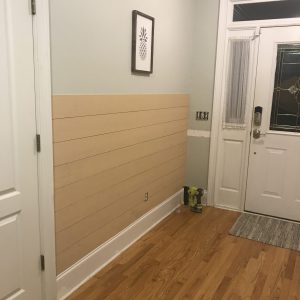
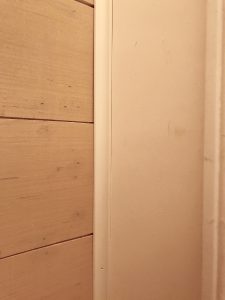
Remember when I said earlier the amazing thing about the Kreg Rip Cut was that the cuts were consistent every time? The cut was not consistent when I had it done in the store because I didn’t account for the blade width. Which meant that not all the boards were the same 6″ width we had hoped for. (Beats head against un-planked wall.) Of course we didn’t know this until I started the installation in the foyer, and noticed that my top boards were not lining up for the top row. Then started a whole lot more math than I had ever wanted to do. Determined to make it work, we went through every cut board and matched them up and laid them out so that when we did the installation, it would come pretty darn close all the way around the foyer. However, the corners were the trickiest and thank goodness to the people who invented corner trim. I love you more than you know. It hid the slight imperfections and finished it off.
We did use our Ryobi jigsaw to cut the shiplap boards to allow for the outlets, which also let to upgrading our outlet covers because the standard builder grade wasn’t going to cut it.
We do have plans to put more shiplap in our house and when we do, you better believe that we will be using the Kreg Rip Cut again. And again. And again. Ain’t nobody got time to go through what we went through when we did the foyer. I am sure I gained a couple gray hairs in that process. Lesson learned.


As for the two projects we completed, I really do love the way the shiplap walls turned out and once we updated the doorknobs and the light fixtures, it really did give our space that rustic farmhouse appeal that we wanted.
I hope you found this post helpful and if you did, please feel free to share away! Of course if you want to stay up to date, don’t forget to subscribe HERE.
XOXO,
Brooke

Let's connect!!
Stay connected for all your DIY and organizing needs!


It looks GREAT, Brooke! Brava!
Thank you Sarah!!!